bux
Member
Registered: 14th Apr 08
Location: Northants
User status: Offline
|
i qualified for totb at pv last year with a 12.7 but that was minus a diff, and nitrous so i felt if i was to be competitive id need to sort some out lol
ok then pics...........
new diff


Nos bottle  the red one is which i will be using the red one is which i will be using

poly bushes

poly bushes fitted

big ends mahined out

new arp rod bolts fitted

flywheel arp's

flywhell shamfered out 

|
bux
Member
Registered: 14th Apr 08
Location: Northants
User status: Offline
|
did bit of work on the corsa tonight, progress includes fitting the nitrous bottle bracket/mout and fitting the bottle.............then stripping half the dash and cutting away most of the plastic, blocking off the heater vents, re-locate the hazards switch, and mount the nitrous contoller in the dash (not yet wired in tho)


next is to cover in the old sterio hole with carbo and mount some switches for arming the nos and the bottle heater, also going to mount the hazard switch there too.........goin to also put some carbon around the nitrous controller to tidy it up 
|
bux
Member
Registered: 14th Apr 08
Location: Northants
User status: Offline
|
right spent alot of time on the corsa over the past few nights and all weekend........progress upto date,
the bottle is all mounted, and the nitous bottle heating system is all up and running via a pressure cut off switch (set to apporx 1000psi ) wiring is all very tidy and stealth like 
nitrous solenoids are all bolted down, wired up and the nos side is all plumbed in upto the solenoid, the max extreme controller is also finished now and wired up apart from the swith to turn on the nos, obviously had to strip half the car to bits to run the nos line down the car and various wiring etc.........
oh also have wired in an led (mates idea) so that i can see when the heater is on, basically becasue it controls itself via the pressure sensor so it will only start to heat below 100psi pressure


pics aint that good just a few to keep you all up to date
|
bux
Member
Registered: 14th Apr 08
Location: Northants
User status: Offline
|
just thought id give you lot summat to look at, this is basically the nos system finished, heres a pic of the engine bay all plumbed in and ready to go (once the correct jets are in the solenoids), you can see the new fuel pressure pipe to the fuel solenoid and the fogger fitted and the nos all connected up!
also is the microswith that i will use to hit the nos........its positioned on a little plate i made up on the steering wheel!
enjoy


|
bux
Member
Registered: 14th Apr 08
Location: Northants
User status: Offline
|
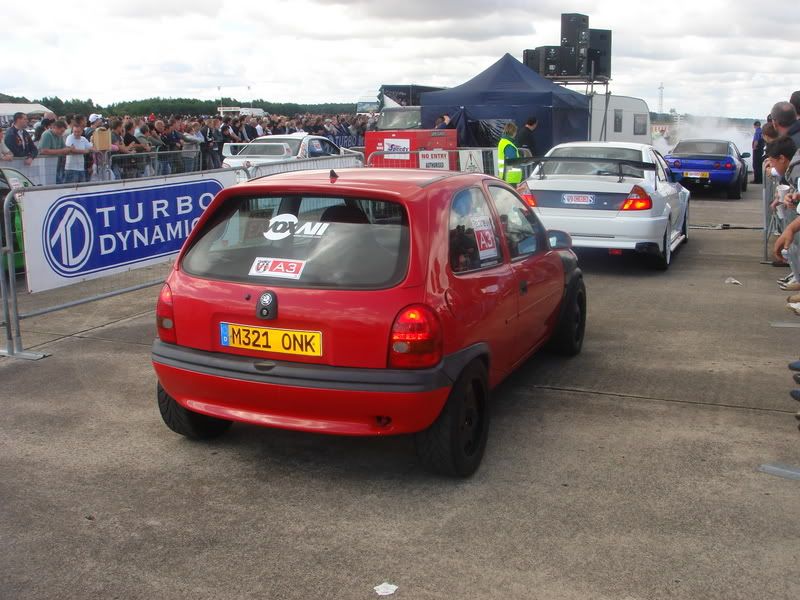
race at tob in team vauxhall and managed to come 4th, lost in the semi final to specky!
following week i raced at usc where i won class c with a 12.1 @118mph
then it was time for another full rebuild, stronger internals to allow for more nitrous and boost, also some more stiffening
few pic updates peeps
new front cross member modification, now extremely strong and can be jacked up there if needed

chassis mod......gettin there

piece of the chassis was lookin a bit poor underneath so decided to plate it now rather than later!!


seam welded more underneath...........

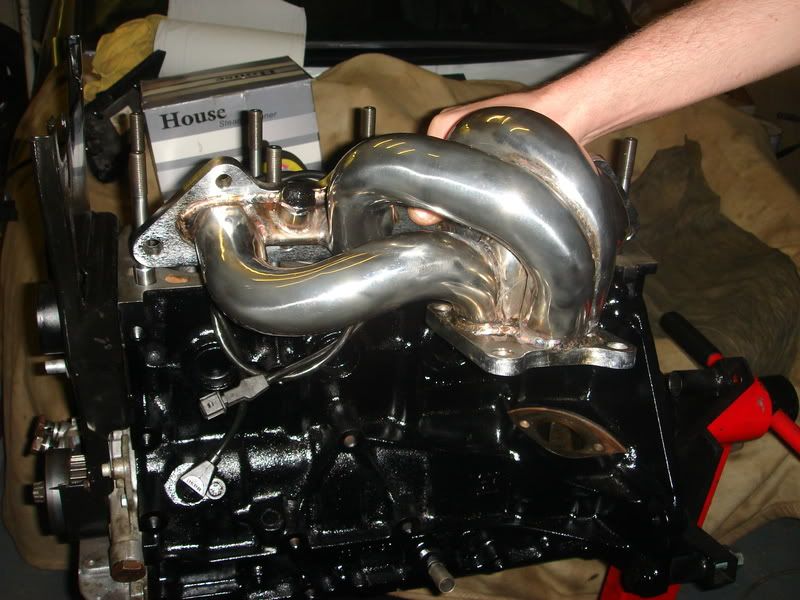
and a bit of prep work in the engine bay............

enjoy!
|
flybikeslee
Member
Registered: 2nd Jan 07
Location: Liverpool
User status: Offline
|
Awesome
|
bux
Member
Registered: 14th Apr 08
Location: Northants
User status: Offline
|
right ive uploaded a few pics of my engine but unfortunately i was in one of them moods when one min it was together and the next it was totally stripped forgetting to take many pics along the way....... sorry peeps!! lol
well heres me timing it up

and here is a quick reference pic of the timing gear

and a pic that some of you have been asking for...........odders engine finally back in the car, and im glad to say he's cracking on with it single handed as we speak!!!
|
bux
Member
Registered: 14th Apr 08
Location: Northants
User status: Offline
|
right then a few updates..............
totally stripped my engine down and took a trip to see steve few weeks ago, well i picked it up on saturday (cheers steve for sorting me out!) with a bit more spec than before!
block was decked, head was skimmed, had oil squirts fitted, some work on the piston crowns, block dipped and few other small jobs, anyway got it home and couldnt wait to get started on it!!!
block back on stand ready for rebuild!!

oil jets...............those of you who no wot your looking for will be able to identify them!

crank back in and torqued up, with rear main all sealed up

cleaned up the block abit more...............

first coat of high temp engine enamel

once dry......tomorrow, oil pump back on, and bottom pulley etc, then await my new rods
|
bux
Member
Registered: 14th Apr 08
Location: Northants
User status: Offline
|
bit more progress tonight...........
the block has had its final coat of paint now, nice and glossy! also started to re-assemble the bottom end etc....... gunna look the tits this time round


engine now capable of taking alot more boost too
|
bux
Member
Registered: 14th Apr 08
Location: Northants
User status: Offline
|
couple of totb piccys!
|
bux
Member
Registered: 14th Apr 08
Location: Northants
User status: Offline
|
ryt some progres pics to keep you lot happy...........
rods turned up


trial fit of ARP bolts in the big ends

pistons all cleaned upand ready to go back on rods

pistons now in block


due to new rods, deckedblock and work to pistons...........piston protrusion was now checked

set up dial gauge

move piston to tdc observing measurements on dial gauge

piston protrusion all ok so carry on and do the 3 stage torque sequence on the big ends making sure correct sequenceis followed!

then put the arp head studsbackin but didnt take any photos of this!
last pic..........................
hmmmmmmmmmmmmmmmmmmmmmm ?!?!
|
bux
Member
Registered: 14th Apr 08
Location: Northants
User status: Offline
|
right car has come on quite abit this weekend, had friday off work to help out with the spraying etc and started rebuilding it yesterday and today! but this time as i said its going to be very different!!! *bow*
firstly car goes two units down to be preped!

then its masked up ready for the paint!

coat of stone chip in the hard wearing areas, such as the front due to the jacking point i made there and on the lower half of the bay!

then parts of the car that went back to metal are primered again!

then 1st base coat is added

2nd base coat is then added more of a check which bits havent been touched and then they are sprayed!
then clearcoat laquer is added.......(no pics inside)
this is the outcome outside dont no why the 1st pic looks orange, also the wings arent totally covered as we ran out of paint! but they will be done in the full spray anyway!


like i said this time things are going to be different!! so 1st job was to find a colour that i liked so that i could base my engine around it! So straight on with cleaning and scothing the brake pipes, masked them all up and painted them up!

whilst base coat dries, rebuild the important bit........lol

and finally brake pipes laquered!

|
bux
Member
Registered: 14th Apr 08
Location: Northants
User status: Offline
|
ok then ive been very busy doin lots of bits and bobs to the corsa, some of which you probably wont even recognise, but as dan said its all little attention to detail bits and bobs......... ive been bugged to update the smallest mods so heres a few pics of some of the things that have been goin on...............
sand blasted parts return from the powder coaters........

pic of the engine bay.............loom now totally redone, cut back, wires removed, re-taped etc, also a few wires are now relocated to give a cleaner look in the bay..........obviously you cant see them as ive hidden them! new rack is on with new powder coated rack mount, rubbers totally cleaned up, more new brake pipe securing clips added, fuel lines located, urmmm...............loads more little bits but not really worht mentioning

and my smoothed washer bottle, part numbers removed from moulding, moulding and joint marks removed, smoothed and painted to match my colour theme hope you like this as it took some time trust!!!!!!

|
bux
Member
Registered: 14th Apr 08
Location: Northants
User status: Offline
|
ok more progress then.........with pics!
valves out of head ready to be lapped in!

pic of valves being lapped in

dont no if you can see from the pic but there is a nice non-metalic grey area around the edge of the valve.....this is a good seat!

valves going back in!

my polished plug cover on a sand blasted cam cover........

head back on and torqued up...........

inlet manifold back on with some nice new silicone hoses!

finally pic with the cambelt on and timed up......... more progess to come

|
flybikeslee
Member
Registered: 2nd Jan 07
Location: Liverpool
User status: Offline
|
theres more! WOW 
|
bux
Member
Registered: 14th Apr 08
Location: Northants
User status: Offline
|
ok a few pics to keep you lot happy! lol
some new brake pipes i made and painted up...........sad i no but they look cool

and the servo nicely painted up............

pic of how it looks at the moment............well i actually did some work on it tonight but no pics

finally a pic of the scuttle pannel, shame you dont see any of it once the cover is on 

|
bux
Member
Registered: 14th Apr 08
Location: Northants
User status: Offline
|
progress......................
got my cam cover and cam belt cover baqck from powder coaters yesterday!


also got my mounts back too, heres one of them fitted

finally got a bit of polishing time in on the buffer at home but no pics............and last progress today was to clean up and re-paint the gearbox, which i will get pics of tomorrow!
|
bux
Member
Registered: 14th Apr 08
Location: Northants
User status: Offline
|
Right then today was the day when i decided to pull my finger out.....lol, am still waiting for my cam cover and cam belt cover to be painted but decided that i would get the engine back together and put back in..............in true fashion i took pics all the way along, well most of the way lol.
so got up my workshop about 9 and put the gearbox bits back on and fitted a new release bearing as the old one decided to get noisey even tho its only done about 3k.........???
Heres how the gearbox looked after another load of work........and the new powder coated mount back on! also note the clutch cable mount that i spent a few hours polishing! lol


then the flywheel was cleaned up and put back on and all torqued up with the arp's. The paddle clutch was also cleaned up and refitted and aligned.

Then i wired up the alternator, starter motor and the oil pressure switch

It was then time for the gearbox to be refitted........

and here is how it sits once again, ready to go back in!

Next job was to move the car into place and get the engine the right way round ready to be put in..............the use of the engine craine is always good!!

20mins later and we have the engine back in!!

After a tea break (lol) got stuck into routing the fuel lines, speedo cable, throttle cable, wiring and hoses etc..........then got fed up and called it a day!


hope you like the pics
steve
|
bux
Member
Registered: 14th Apr 08
Location: Northants
User status: Offline
|
heres a few progress pics from yesterday........
sneaky pic of how clean the block/tubby is.......

heres my poly bushes (sorry ross cant afford rose joints on my car just yet! )

parts in paint shop ready to be painted.......

dizzy in primer........

parts in base coat

poly bushes back on tie rods........

how it was looking last night!

ooooooooooooooh is that carbon i see

cam cover and plug cover......... pee'd off about the little mark i should hvae removed on the corner but thought the powder coat wud fill it - how wrong was i !!!

cam belt cover straight from paint, not flatted and polished yet!

and finally the dizzy..........

did loads today, inc flatting and polishing parts, wired up engine and fitted some parts..............pics to come!
|
bux
Member
Registered: 14th Apr 08
Location: Northants
User status: Offline
|
Ok heres wot i did yesterday and today...........
pics of the cam cover and cam belt cover after the flat and polish (ignor the white compound)


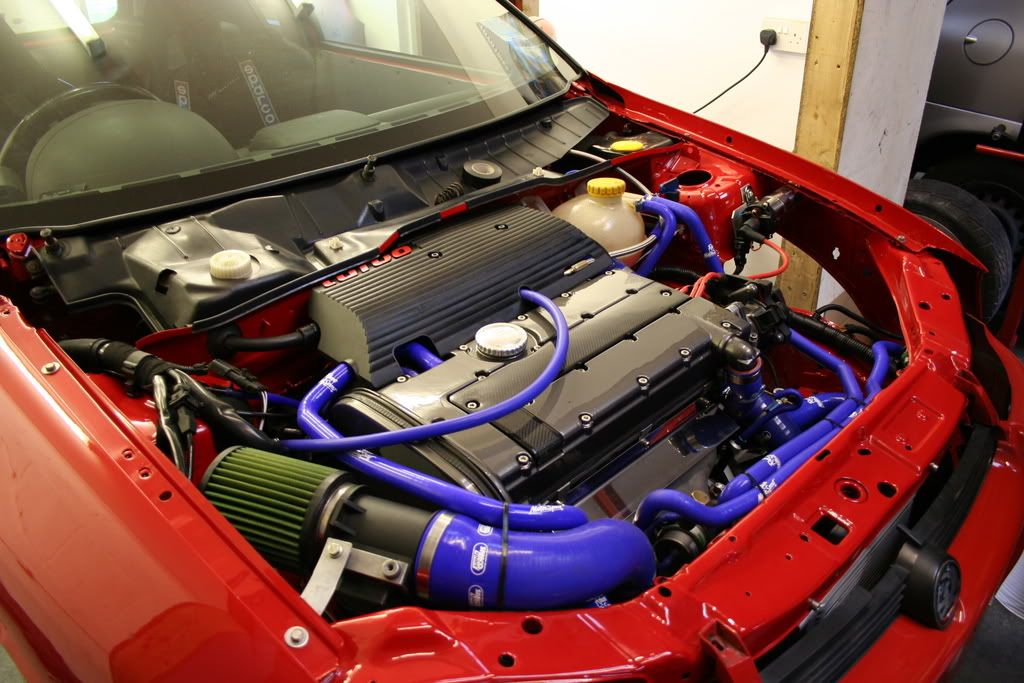
and here is the engine bay...................in my opinion the pics look crap, when you see it i think youll be proper lovin it!!


its pretty much wired up now and piped in, just bits and bobs to do!!
|
bux
Member
Registered: 14th Apr 08
Location: Northants
User status: Offline
|
right heres a few picture updates for you to take a look at!


enjoy!
|
bux
Member
Registered: 14th Apr 08
Location: Northants
User status: Offline
|
and here it is running again! its a tad loud due to the fact it has no exhaust on it! lol

|
bux
Member
Registered: 14th Apr 08
Location: Northants
User status: Offline
|
right then...................bit more progress today..........not a great deal but some finishing touches on the engine!
i spent a good couple of hours chopping and sanding down my top hat turbo cover..............it sat wonky last year and after i added the nitrous fuel feed pipe it sat high on 1 side, so after a few mins thinking time this is how it ended up..........


|
bux
Member
Registered: 14th Apr 08
Location: Northants
User status: Offline
|
|
bux
Member
Registered: 14th Apr 08
Location: Northants
User status: Offline
|
another vid of it, with a bit of a rev up! ignor the driveshaft spinning! lol
but you can see the front kinda..............suspension is off at the powder coaters so hopefully will be abck on over the weeknd!
enjoy...............

|


